Trong bài viết này, chúng ta sẽ xem cách tạo một REST API với FOS/RestBundle, bao gồm xác thực, và công cụ tạo tài liệu giống như Swagger.
Danh sách các gói cần thiết:
friendsofsymfony/rest-bundle: Cung cấp một bộ công cụ giúp phát triển API RESTful
https://github.com/FriendsOfSymfony/FOSRestBundle
jms/serializer-bundle: Cho phép việc chuẩn hóa đối tượng.
https://packagist.org/packages/jms/serializer-bundle
lexik/jwt-authentication-bundle: Quản lý token web JSON.
https://github.com/lexik/LexikJWTAuthenticationBundle
nelmio/NelmioApiDocBundle: Tạo tài liệu HTML giống như Swagger
https://github.com/nelmio/NelmioApiDocBundle
Cài đặt trong composer
Chúng tôi sẽ giả sử rằng chúng tôi đang sử dụng khung sườn của mình làm điểm xuất phát.
composer require "nelmio/cors-bundle"
composer require "lexik/jwt-authentication-bundle"
composer require "jms/serializer-bundle"
composer require "friendsofsymfony/rest-bundle"
composer require "nelmio/api-doc-bundle"
composer require "annotations"
Sau đó chúng ta cần đăng ký các gói của mình trong bundles.php
Nelmio\CorsBundle\NelmioCorsBundle::class => ['all' => true],
    Lexik\Bundle\JWTAuthenticationBundle\LexikJWTAuthenticationBundle::class => ['all' => true],
    FOS\RestBundle\FOSRestBundle::class => ['all' => true],
    Nelmio\ApiDocBundle\NelmioApiDocBundle::class => ['all' => true],
Đối với tài liệu, cần phải thêm tuyến đường:
# config/routes.yaml
app.swagger_ui:
    path: /api/doc
    methods: GET
    defaults: { _controller: nelmio_api_doc.controller.swagger_ui }

app.swagger:
    path: /api/doc.json
    methods: GET
    defaults: { _controller: nelmio_api_doc.controller.swagger }
Tạo cấu hình cho tài liệu:
# config/packages/nelmio_api_doc.yaml
nelmio_api_doc:
    areas:
        path_patterns: # an array of regexps
            - ^/api(?!/doc$)
        host_patterns:
            - ^api\.
Sau đó, chúng ta phải kích hoạt các bộ chuyển đổi framework bổ sung:
#/config/packages/sensio_framework_extra.yaml
sensio_framework_extra:
    router:
        annotations: false
    request: { converters: true }
Tạo phương thức API đầu tiên của chúng ta
Đầu tiên, chúng ta sẽ tạo bộ điều khiển của mình
bin/console make:controller api
Trong bộ điều khiển của chúng ta, chúng ta phải bao gồm thư viện chú thích FOSRestBundle của mình để sử dụng các chú thích đúng, cũng như thư viện NelmioApiDoc
<?php

namespace App\Controller;

use Symfony\Bundle\FrameworkBundle\Controller\AbstractController;
use FOS\RestBundle\Controller\Annotations\Get;
use JMS\Serializer\SerializationContext;
use Symfony\Component\HttpFoundation\Response;
use Swagger\Annotations as SWG;
use Nelmio\ApiDocBundle\Annotation\Model;
use Nelmio\ApiDocBundle\Annotation\Security;

class ApiController extends AbstractController
{

    /**
     * @Get(
     *     path = "/api/test/{id}",
     *     name = "api_test_id",
     *     requirements = {"id"="\d+"}
     * )
     */
    public function index()
    {
        $detail=['test'=>'value'];

        $serializer = $this->get('serializer');
        $response = new Response(
            $serializer->serialize(['detail' => $detail], 'json'),
            Response::HTTP_OK
            );
        $response->headers->set('Content-Type', 'application/json');

        return $response;
    }
}
Để quản lý các mã phản hồi, chúng ta sẽ phải sử dụng các chú thích sau:
     * @SWG\Response(
     *     response=200,
     *     @SWG\Schema(type="object",
     *         example={"foo": "bar", "hello": "world"}
     *     ),
     *     description="Response ok"
     * )
     * @SWG\Response(
     *     response=401,
     *     description="Access Denied"
     * )
     * @SWG\Response(
     *     response=403,
     *     description="Forbidden"
     * )
     * @SWG\Response(
     *     response=404,
     *     description="Not Found"
     * )

Xác thực API của chúng ta
Đối với xác thực, chúng ta chọn giữ nó đơn giản. Không phải xác thực kiểu tiêu đề Bearer, mà chỉ là một khóa trong URL.
Nó dễ kiểm tra hơn, đặc biệt khi bạn làm việc với các bên thứ ba, và bạn không muốn cung cấp hỗ trợ khắp mọi nơi và đào tạo thực tập sinh của họ. Mặc dù thêm một khóa vào tiêu đề thực sự không quá phức tạp. Dù sao đi nữa.
Vì vậy, chúng ta sẽ khai báo khóa của mình trong các chú thích của phương thức của mình.
     * @SWG\Parameter(
     *     name="key",
     *     in="query",
     *     type="string",
     *     description="The authorization key"
     * )
Kết hợp với định nghĩa API của chúng ta, nó trông như thế này:
/**
 * @Get(
 *     path = "/api/test/{id}",
 *     name = "api_test_id",
 *     requirements = {"id"="\d+"}
 * )
 *
 *
 * @SWG\Parameter(
 *     name="key",
 *     in="query",
 *     type="string",
 *     description="The authorization key provided by HMF"
 * )
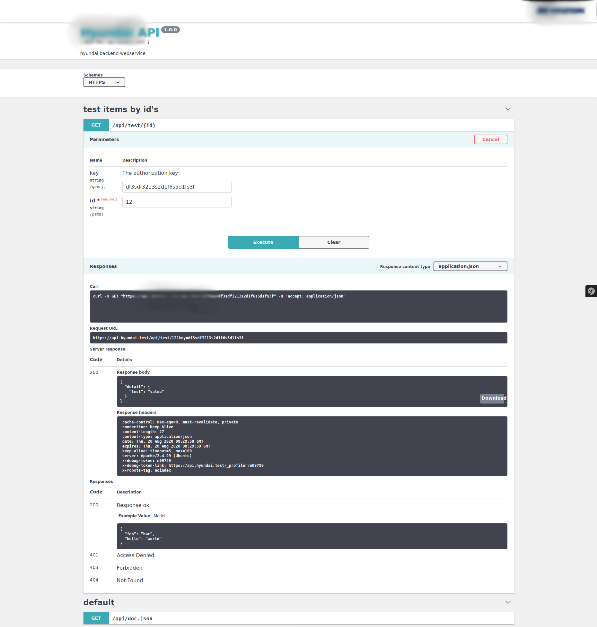
Và trong Swagger, nó sẽ hiện ra như thế này:

Tùy chỉnh tài liệu
Tài liệu có một số vấn đề hiển thị, đặc biệt là với phong cách, và nó hiển thị logo của một gói khi chúng ta muốn hiển thị logo của khách hàng thay vì.
Vì vậy, chúng ta chỉ cần ghi đè mẫu bằng cách tạo một tệp Twig ở đây:
/templates/bundles/NelmioApiDocBundle/SwaggerUi/index.html.twig
{# templates/bundles/NelmioApiDocBundle/SwaggerUi/index.html.twig #}

{#
    To avoid a "reached nested level" error an exclamation mark `!` has to be added
    See https://symfony.com/blog/new-in-symfony-3-4-improved-the-overriding-of-templates
#}
{% extends '@!NelmioApiDoc/SwaggerUi/index.html.twig' %}

{% block stylesheets %}
    {{ parent() }}
    <link rel="stylesheet" href="{{ asset('css/custom-swagger-styles.css') }}">
    <style>
    header #logo img{
    	height: unset;
    }
    header::before{
	background-color: #FFFFFF;
    }
    .swagger-ui table tbody tr td, .response-col_description__inner{
    	padding: 0;
    	vertical-align: top;
    }
    .swagger-ui .markdown p{
		margin: 10px auto;
    }
</style>
{% endblock stylesheets %}

{% block javascripts %}
    {{ parent() }}
    <script type="text/javascript" src="{{ asset('js/custom-request-signer.js') }}"></script>
{% endblock javascripts %}


{% block header %}
    <a id="logo" href="#"><img src="{{ asset('images/logo.png') }}" alt="Hyundai"></a>
{% endblock header %}
Chúng ta cũng muốn cho phép chỉ JSON và kiểm tra trong HTTPS, vì miền của chúng ta đang ở trong HTTPS, và nếu người dùng (thực tập sinh) kiểm tra trong HTTP trong khi tài liệu ở trong HTTPS, trình duyệt sẽ chặn yêu cầu. Đó là điều ngớ ngẩn, nhưng nó là một vấn đề thực tế. 😊
Chúng ta cũng sẽ đặt một tiêu đề, loại bỏ xác thực Bearer, và loại bỏ xác minh máy chủ.
# config/packages/nelmio_api_doc.yaml
nelmio_api_doc:
    areas:
        path_patterns: # an array of regexps
            - ^/api(?!/doc$)
#        host_patterns:
#            - ^api\.
#
    documentation:
        host: api.hyundai.test
        #schemes: [http, https]
        schemes: [https]
        info:
            title: Hyundai API
            description: hyundai backend webservice
            version: 1.0.0
        #securityDefinitions:
        #    Bearer:
        #        type: apiKey
        #        description: 'Value: Bearer {jwt}'
        #        name: Authorization
        #        in: header
        #security:
        #    - Bearer: []
Và đó là tất cả! Chúng ta đã sẵn sàng để phát triển API của mình.
Điều còn lại là tạo một CRUD cho các khóa và áp dụng logic của chúng ta cho dữ liệu cung cấp cho mỗi phương thức.