We will see how to create a Token (Smart Contract) on the Binance Smart Chain (BSC) and deploy it to allow everyone to trade it.
We assume that you already know the principles of cryptocurrency, that you have already bought some, and that you know how wallets work.
Smart Contracts are programs that directly control digital assets. These are the programs that, once "inserted" into the blockchain, define how these assets will be managed.
Once the program is added to the blockchain, it cannot be modified and it is impossible to delete it.
Here we use the Smart Contract mechanisms of the Binance Blockchain, the BSC (on the BEP20 network).
We have chosen the BSC because the gas fees are very low.
It is possible to do the same thing on the Ethereum Blockchain (ERC20) but each transaction can represent several tens of euros against a few fractions of cents on the BSC.
Adding the BSC network to the MetaMask wallet
To validate transactions on the BSC you will need a wallet connected to the BEP20 network.
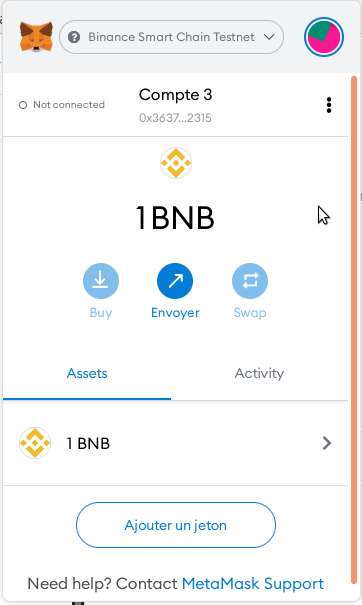
For this we will install MetaMask, add some BNB (the currency needed to pay the transaction fees), and link it to the BEP20 network.
You can install it on your phone or on your PC (preferable for following this article).
https://metamask.io/download
Make a note of your seed phrase (the private key) and keep it in a safe place.
Never transfer it to a third party.
This key will allow you to reinstall your wallet later.
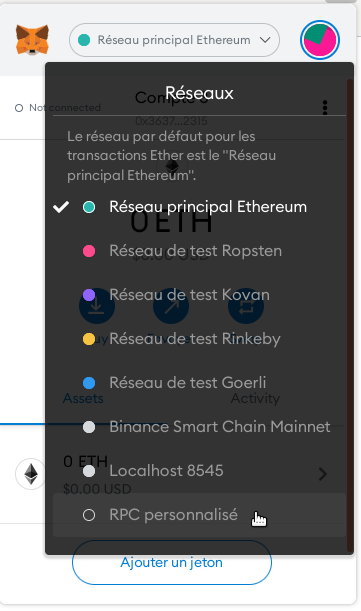
Once installed you will need to go to the extension settings and add the BSC network.
Click on the middle bar containing the name of the network then on "custom RPC".
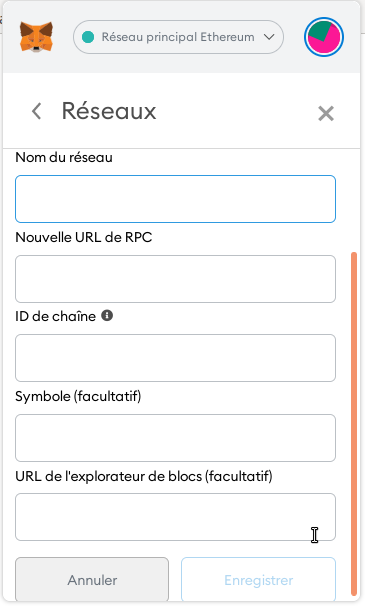
Complete the following form:
For the Main Net (Main Net):
Network Name: Binance Smart Chain
New RPC URL:https://bsc-dataseed.binance.org/
ChainID: 56
Symbol: BNB
Block Explorer URL: https://bscscan.com
Then for the test network (Testnet): https://docs.binance.org/smart-chain/developer/rpc.html
Network Name: Binance Smart Chain Testnet
New RPC URL:https://data-seed-prebsc-2-s1.binance.org:8545/
ChainID: 97
Symbol: BNB
Block Explorer URL: https://testnet.bscscan.com
In general, to test your contract, you will start by publishing it in the testnet.
For this you will need to credit your wallet with test BNB (fortunately free).
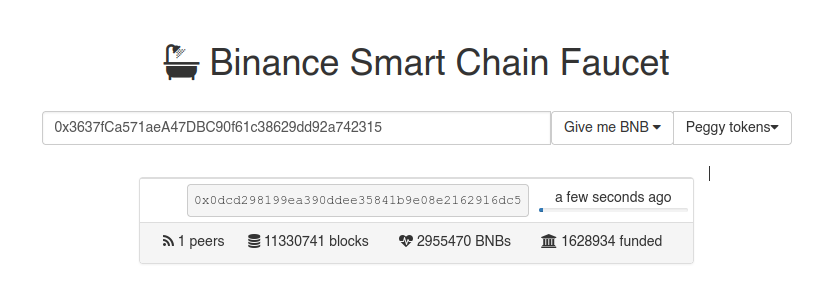
You just have to go to the following page: https://testnet.binance.org/faucet-smart
Then enter the address of your wallet.
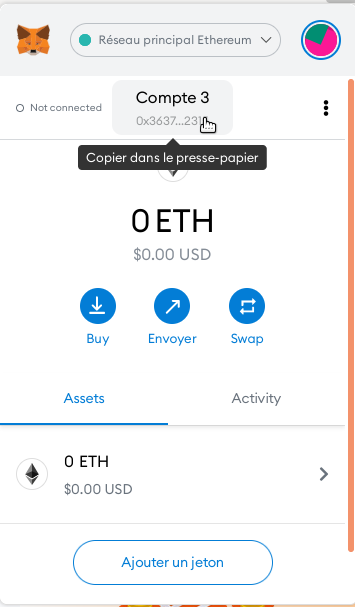
Your address is here:
You enter your address then select 1 BNB from the 'Give me BNB' list.
Your account will be automatically credited.
Creating your Smart Contract
We have previously seen that a Smart Contract was a program inserted into the blockchain.
For the BEP20 network (BSC), the programming language used is Solidity.
You will find the complete documentation here: https://solidity-fr.readthedocs.io/fr/latest/
Honestly, it's not very complicated. You just have to RTFM, like pretty much all languages. It is as accessible as JavaScript.
To draft our program, compile it and publish it, we will do it directly online on the site https://remix.ethereum.org/
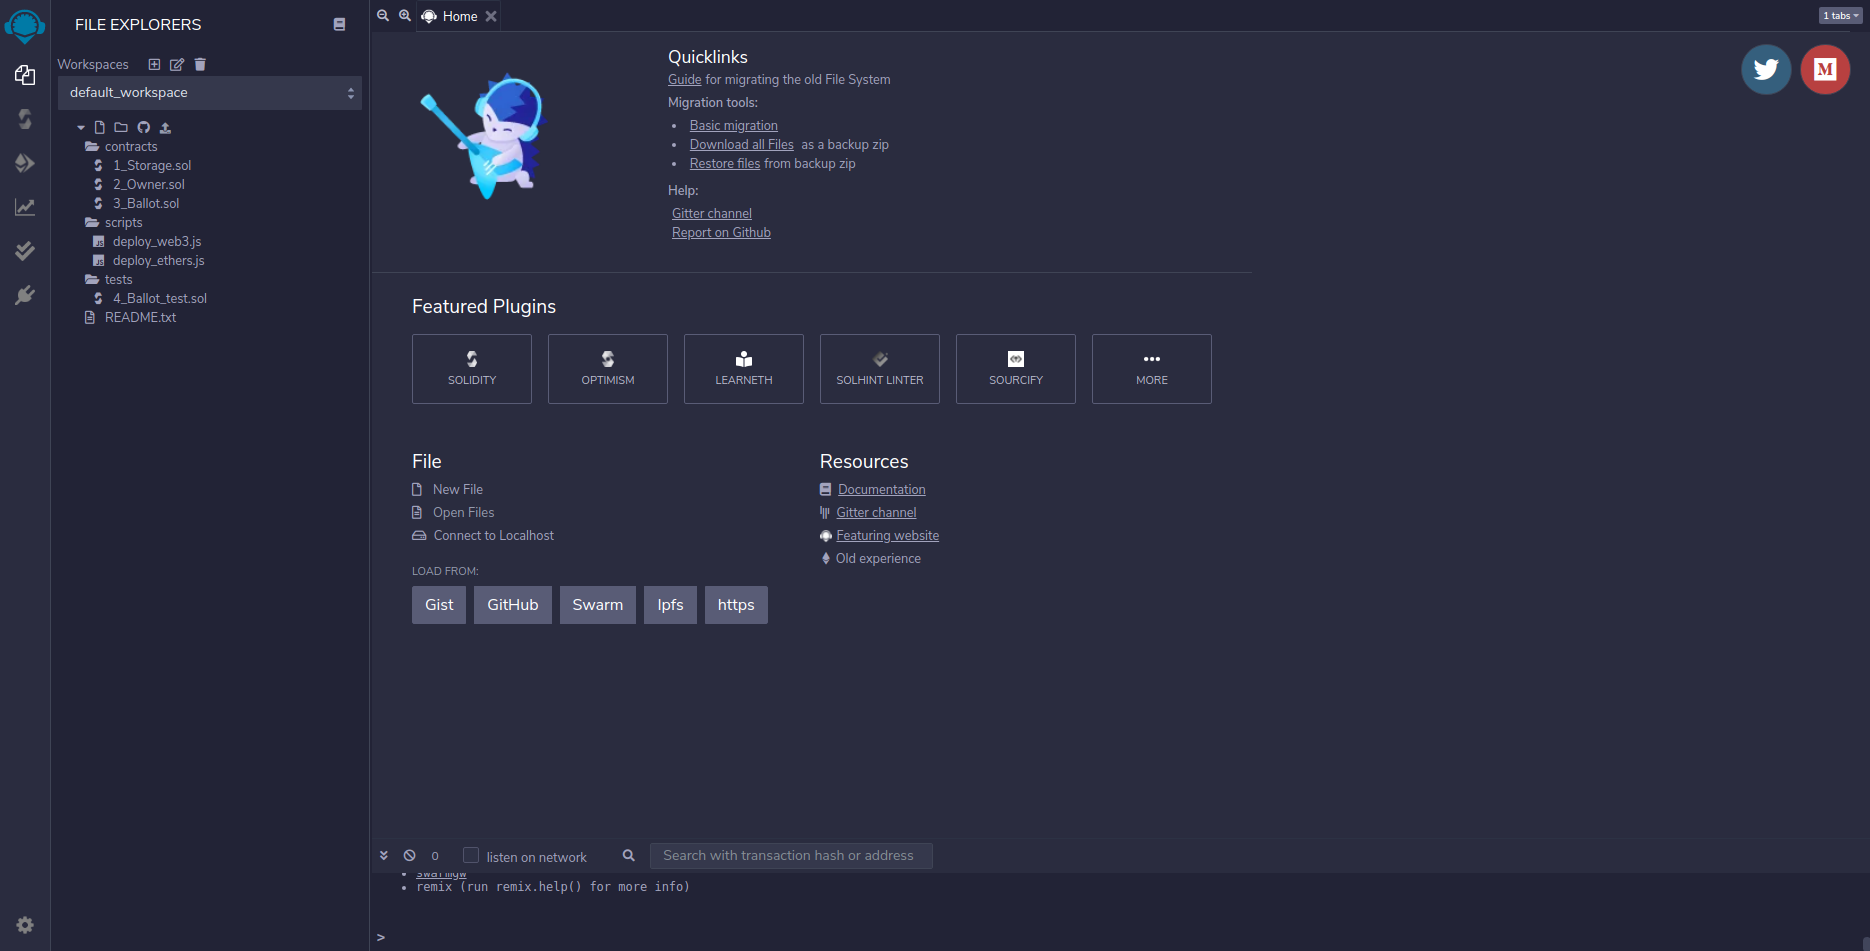
Everything will be done directly from this site.
We are going to create a Token called the "PartiTech Token" with the symbol "PTECH".
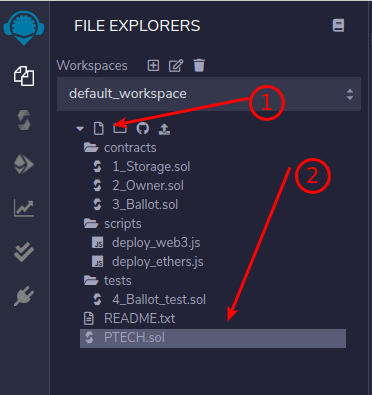
1 – We create our file
We will take care to name our file after our project.
2 – The header of our file
This is very important, it is what will define the version of the compiler used and consequently the version of the language.
In our case, we will use the latest version:
pragma solidity ^0.8.4;
3 – The body of our program
We then create our contract through the "contract" declaration that we will name in the same way as our file (which is a bit cleaner).
Note that you can declare as many contracts as you want in a single file.
pragma solidity ^0.8.4;

contract PTECH
{

}
4 – Definition of our contract
We will need to define some parameters of our contract.
Its name, the number of tokens, and its symbol.
Let's stop for a moment on the syntax we are going to use. We need to declare variables.
Like in most languages, they are typed (int, string, bool etc) and have a scope (public or private).
In blockchain everything is public. So don't be mistaken about the notion of private, it's a scope of access of the value but it is always possible to access it.
pragma solidity ^0.8.4;

contract PTECH
{
    uint private totalSupply = 1 000 000 000 000;
    string public name = "Parti Tech Token";
    string public symbol = "PTECH";
}
Our contract will have 1k Billion tokens available and will be called the "Parti Tech Token" with the symbol "PTECH".
(Honestly, we didn't hesitate long between PTECH and PTT...)
So as you see, declaring a string is very simple:
Type+Scope+Name = value;
But that's not all.
We want to add decimals to our token so that traders can buy fractions of it. We will therefore specify the number of decimals.
pragma solidity ^0.8.4;

contract PTECH
{
    uint private totalSupply = 1 000 000 000 000 * 10 ** 18;
    string public name = "Parti Tech Token";
    string public symbol = "PTECH";
    uint public decimals = 18;

}
Note our new variable "decimals" and the modification made on the "totalSupply" variable.
18 decimals, then a number of tokens of 1 000 000 000 000 * 10 ** 18
The double * is used to give the power of the number, and we multiply the number of tokens by 10 because from the wallet's point of view to display a token, it needs 10 units. So we have to multiply the actual number of tokens by 10 to the power of 18 for the decimals.
5 – Add the mapping of tokens to addresses
At this stage, our contract doesn't even know that it's supposed to allocate tokens to users. For now, it just knows it has a total number of tokens whose allocation is completely unknown to it.
To do this, we will add a mapping of people's addresses (wallets) to the distribution of tokens we will call balance (like a balance in accounting).
pragma solidity ^0.8.4;

contract PTECH
{
    mapping (address => uint) public balances;
    uint private totalSupply = 1 000 000 000 000 * 10 ** 18;
    string public name = "Parti Tech Token";
    string public symbol = "PTECH";
    uint public decimals = 18;

}
By doing this, we assign to our object "balances" the set of addresses that will interact with our contract. Later on, we will be able to manipulate "balance" to add or remove tokens to addresses.
To put it simply, we're going to map an index to a value. The index will be the address of a user and the value the tokens they have bought or won (yes, because you're not forced to buy the token, you can also win them, like with deflationary tokens).
6 – The constructor
The constructor is like a "constructor" in other languages. It's a function that will be executed only once in the program's life. And since we saw that the program is executed for life, without the possibility of updating it, the constructor will really be executed only once.
pragma solidity ^0.8.4;

contract PTECH
{
    mapping (address => uint) public balances;
    uint private totalSupply = 1 000 000 000 000 * 10 ** 18;
    string public name = "Parti Tech Token";
    string public symbol = "PTECH";
    uint public decimals = 18;

    constructor(){
        balances[msg.sender]=totalSupply;
    }


}
Let's sum up what we've just added.
Our constructor takes no arguments. In it, we assign the entire set of tokens to a specific index. Our index is an address.
To understand the mechanism better, with each interaction between a user and our program, the blockchain will send messages. An input message, a return message.
When the contract is published, the publisher of the contract is us.
So the input message, which is represented by the "msg" object, contains as a parameter "sender" our address.
We therefore assign to our address the entire set of available tokens.
We could very well distribute the tokens over several addresses. For example, create a dead wallet and assign a percentage of our tokens to it from the creation of the contract.
We could also create a wallet for marketing, for the devs and distribute them tokens that they will use later, when there is liquidity, to remunerate themselves or finance a marketing action.
7 – Function to read a user's balance
We must now produce a series of functionalities to our program that will allow managing the basic functions of our contract.
The first is to retrieve the user's balance.
In short, when you open your wallet, the first thing it's going to do is to send a request to the contract to retrieve your balance.
And the protocol is going to execute a function defined by the protocol called "balanceOf()". This function will always take the address of the messenger as an argument.
pragma solidity ^0.8.4;

contract PTECH
{
    mapping (address => uint) public balances;
    uint private totalSupply = 1 000 000 000 000 * 10 ** 18;
    string public name = "Parti Tech Token";
    string public symbol = "PTECH";
    uint public decimals = 18;

    constructor(){
        balances[msg.sender]=totalSupply;
    }

    function balanceOf(address user) public view returns (uint)
    {
        return balances[user];

    }

}
Wait. Take 2 seconds to analyze the syntax of our function.
function balanceOf(address user) public view returns (uint)
In summary, what have we just done? We specify the return type that our function will produce. Simply put.
With a public or private scope and an integer type return (uint). And importantly, the property is only readable (view, in other words read-only).
Then we see that our function takes an input variable user which is an address and that we then return the assigned value for the corresponding index to our address in our "balances" array.
8 – The transfer of tokens to users
We now need to define the interaction between each transaction.
When a user is going to buy our token on a marketplace they're going to send us a transfer request. Upon receipt, we will have to assign the number of tokens to our user.
If we wanted to make a system like the DOGE coin, which creates tokens with every transaction, we could do it here. Similarly, if we wanted to make a Burn mechanism, we could do it here too.
As you see, all these terms that circulate around contracts are actually very simple to implement.
A simple mathematical rule.
We won't do that here. Let's keep it simple.
So with each transaction the blockchain protocol is going to send us a message that will call the "transfer()" function which will contain the user's address.
pragma solidity ^0.8.4;

contract PTECH
{
    mapping (address => uint) public balances;
    uint private totalSupply = 1 000 000 000 000 * 10 ** 18;
    string public name = "Parti Tech Token";
    string public symbol = "PTECH";
    uint public decimals = 18;

    constructor(){
        balances[msg.sender]=totalSupply;
    }

    function balanceOf(address user) public view returns (uint)
    {
        return balances[user];

    }

    function transfer(address to, uint value) public view returns (uint)
    {
        require(balanceOf(msg.sender)>=value, "Solde est insuffisant");

    }

}
Basically, a transaction is a transfer of a value from one address to another. So if holder A wants to transfer a token to holder B, it is imperative that A possess at least 1 token.
For this we will use the "require" instruction, which allows for the validation of a condition. If the condition fails, then the process is stopped, and an error is returned to the protocol which takes care of transmitting it to the user.
So what we do is retrieve the user's address and call our "balanceOf" function which returns the balance for the given address and validate that the number of tokens to be transferred is available in the order giver's balance.
If the balance is insufficient, we stop the transaction.
Note that the msg object is global and available at any time in each function at the time of a transaction.
Depending on the result, we increment the balance of the recipient and decrement the balance of the order giver.
pragma solidity ^0.8.4;

contract PTECH
{
    mapping (address => uint) public balances;
    uint private totalSupply = 1 000 000 000 000 * 10 ** 18;
    string public name = "Parti Tech Token";
    string public symbol = "PTECH";
    uint public decimals = 18;

    constructor(){
        balances[msg.sender]=totalSupply;
    }

    function balanceOf(address user) public view returns (uint)
    {
        return balances[user];

    }

    function transfer(address to, uint value) public view returns (uint)
    {
        require(balanceOf(msg.sender)>=value, "Solde est insuffisant");
        balances[to]+=value;
        balances[msg.sender]-=value;
    }

}
Once the balance is done, we will write in the blockchain. For this we will emit a "Transfer" event.
A bit like in JS we could do a fire event in the DOM.
To invoke an event, we use the keyword "emit", and to declare the event, we use the keyword "event".
pragma solidity ^0.8.4;

contract PTECH
{
    mapping (address => uint) public balances;
    uint private totalSupply = 1 000 000 000 000 * 10 ** 18;
    string public name = "Parti Tech Token";
    string public symbol = "PTECH";
    uint public decimals = 18;

    event Transfer(address indexed from, address indexed to, uint value);

    constructor(){
        balances[msg.sender]=totalSupply;
    }

    function balanceOf(address user) public view returns (uint)
    {
        return balances[user];

    }

    function transfer(address to, uint value) public returns (bool)
    {
        require(balanceOf(msg.sender)>=value, "Solde insuffisant");
        balances[to]+=value;
        balances[msg.sender]-=value;
        emit Transfer(msg.sender, to, value);
        return true;
    }

}
So once validated, we send a transfer order from the order giver "msg.sender" to the recipient "to" for a value "value".
8 – Transfer delegation
Transfer delegation gives the possibility to a third party to make transfers on behalf of the contract holder. This is exactly what decentralized finance (DEFI) does.
So what happens is that we authorize the contract to make transfers on our behalf which then allows the contract to pass orders from the holder's address to the recipient's address.
pragma solidity ^0.8.4;

contract PTECH
{
    mapping (address => uint) public balances;
    mapping (address => mapping (address=>uint)) public allowance;

    uint private totalSupply = 1 000 000 000 000 * 10 ** 18;
    string public name = "Parti Tech Token";
    string public symbol = "PTECH";
    uint public decimals = 18;

    event Transfer(address indexed from, address indexed to, uint value);
    event Approval(address indexed owner, address indexed spender, uint value);

    constructor(){
        balances[msg.sender]=totalSupply;
    }

    function balanceOf(address user) public view returns (uint)
    {
        return balances[user];

    }

    function transfer(address to, uint value) public returns (bool)
    {
        require(balanceOf(msg.sender)>=value, "Solde insuffisant");
        balances[to]+=value;
        balances[msg.sender]-=value;
        emit Transfer(msg.sender, to, value);
        return true;
    }

    function approve(address spender, uint value) public  returns (bool)
    {
        allowance[msg.sender][spender]=value;
        emit Approval(msg.sender, spender, value);
        return true;
    }

}
I will not go back over the concepts we have seen above.
We create a mapping of addresses which contains a mapping of addresses itself. Basically a 3D array.
We create a "approve" function which will assign a value to our mapping of addresses. This will allow telling the system that this address is authorized to spend on our behalf a certain number of tokens.
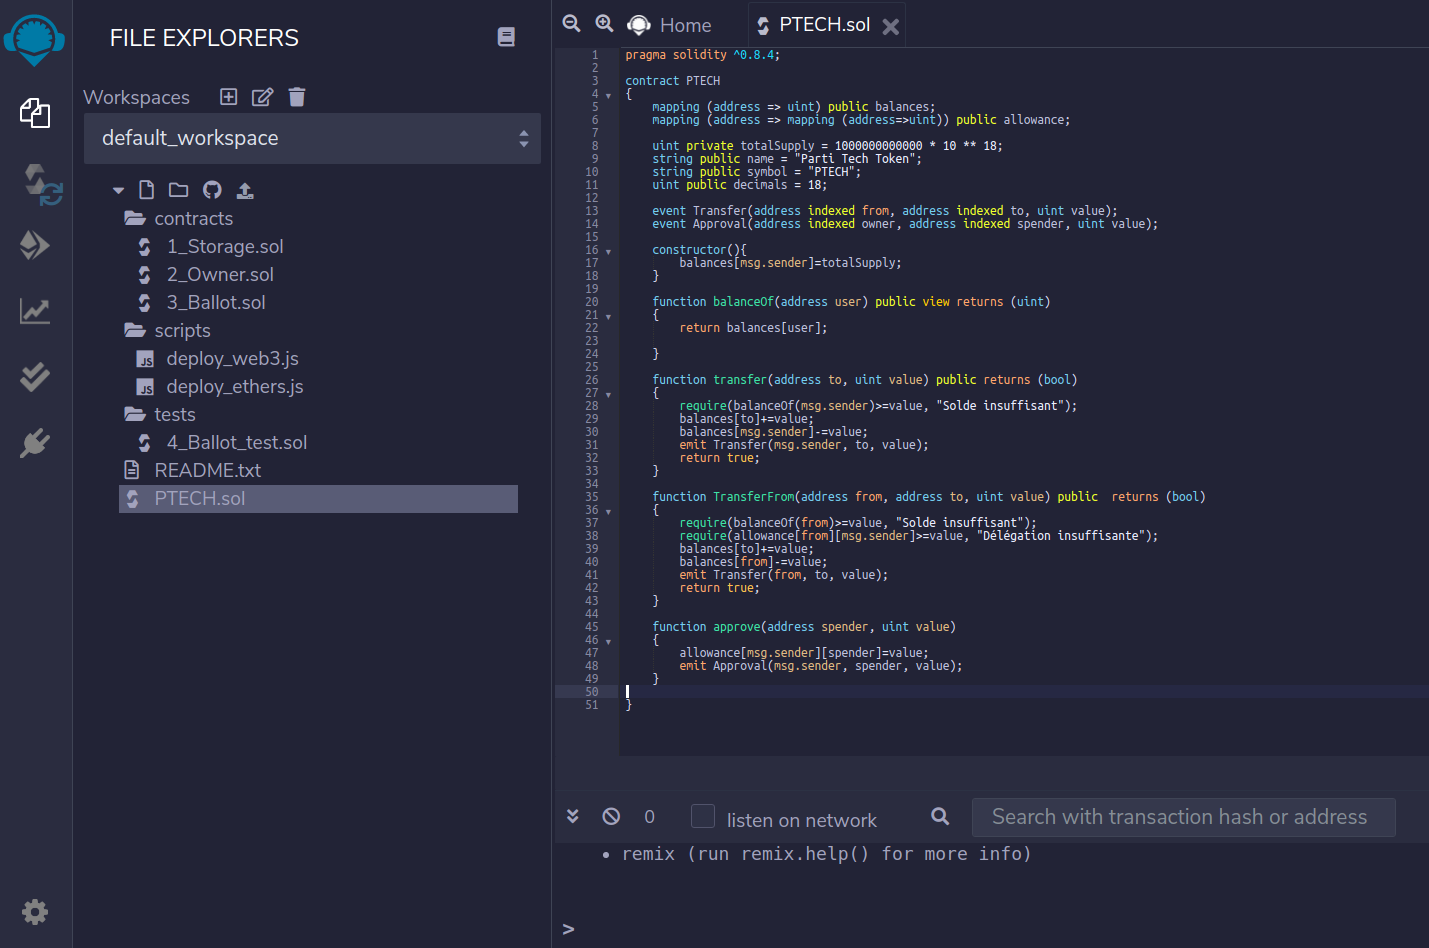
We add a "TransferFrom" function which, when the order is delegated, will verify the balance and the delegation. If the balance is sufficient and the delegation is also sufficient, then we calculate the balances of our "balances" array and we emit a transfer event to write in the blockchain.
pragma solidity ^0.8.4;

contract PTECH
{
    mapping (address => uint) public balances;
    mapping (address => mapping (address=>uint)) public allowance;

    uint private totalSupply = 1 000 000 000 000 * 10 ** 18;
    string public name = "Parti Tech Token";
    string public symbol = "PTECH";
    uint public decimals = 18;

    event Transfer(address indexed from, address indexed to, uint value);
    event Approval(address indexed owner, address indexed spender, uint value);

    constructor(){
        balances[msg.sender]=totalSupply;
    }

    function balanceOf(address user) public view returns (uint)
    {
        return balances[user];

    }

    function transfer(address to, uint value) public returns (bool)
    {
        require(balanceOf(msg.sender)>=value, "Solde insuffisant");
        balances[to]+=value;
        balances[msg.sender]-=value;
        emit Transfer(msg.sender, to, value);
        return true;
    }

    function TransferFrom(address from, address to, uint value) public  returns (bool)
    {
        require(balanceOf(from)>=value, "Solde insuffisant");
        require(allowance[from][msg.sender]>=value, "Délégation insuffisante");
        balances[to]+=value;
        balances[from]-=value;
        emit Transfer(from, to, value);
        return true;
    }

    function approve(address spender, uint value) public  returns (bool)
    {
        allowance[msg.sender][spender]=value;
        emit Approval(msg.sender, spender, value);
        return true;
    }

}
Deployment of the contract in the Blockchain
For the deployment, we stay in our editor on the site https://remix.ethereum.org/
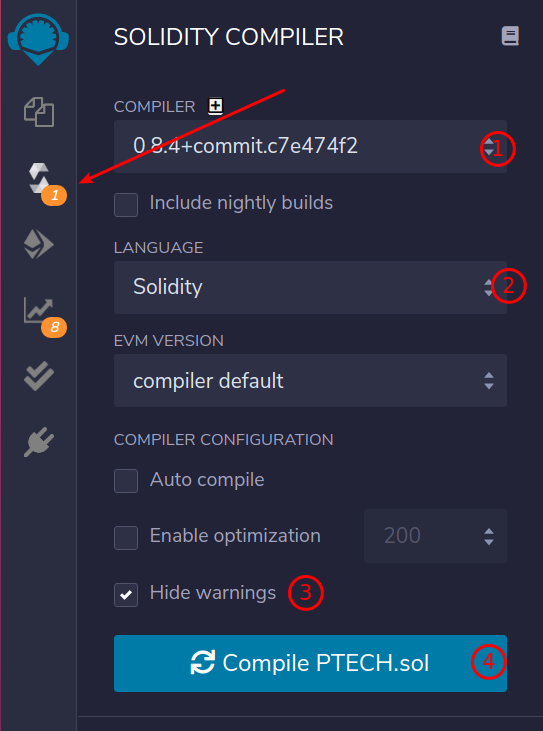
We will now compile our contract while ensuring the version of the compiler and the language type.
We will tick "Hide warning" so we don't get cluttered with non-blocking messages.
You then need to inject web3 into your project. Basically, this will link your MetaMask wallet to your contract.
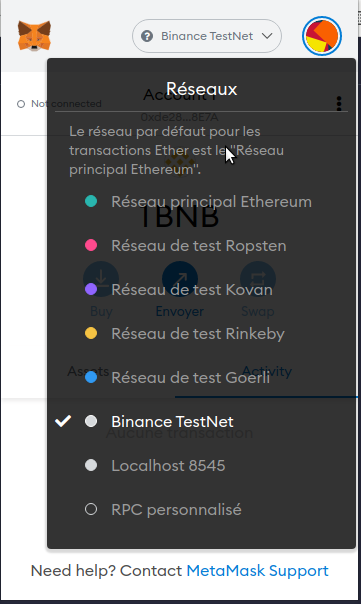
We will position MetaMask on the TestNet network beforehand.
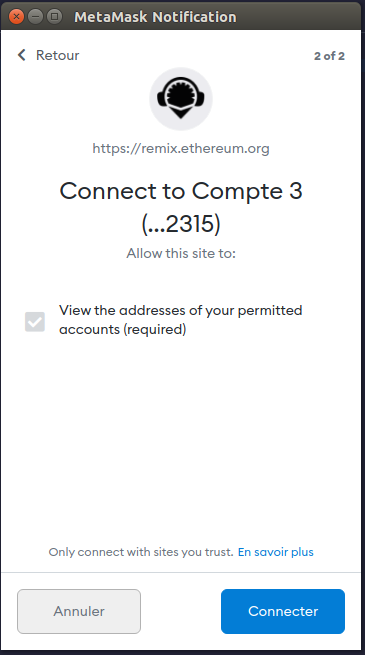
Then we position ourselves in the deployment tab, we inject "Web3", MetaMask opens and asks us to validate which account we want to use.
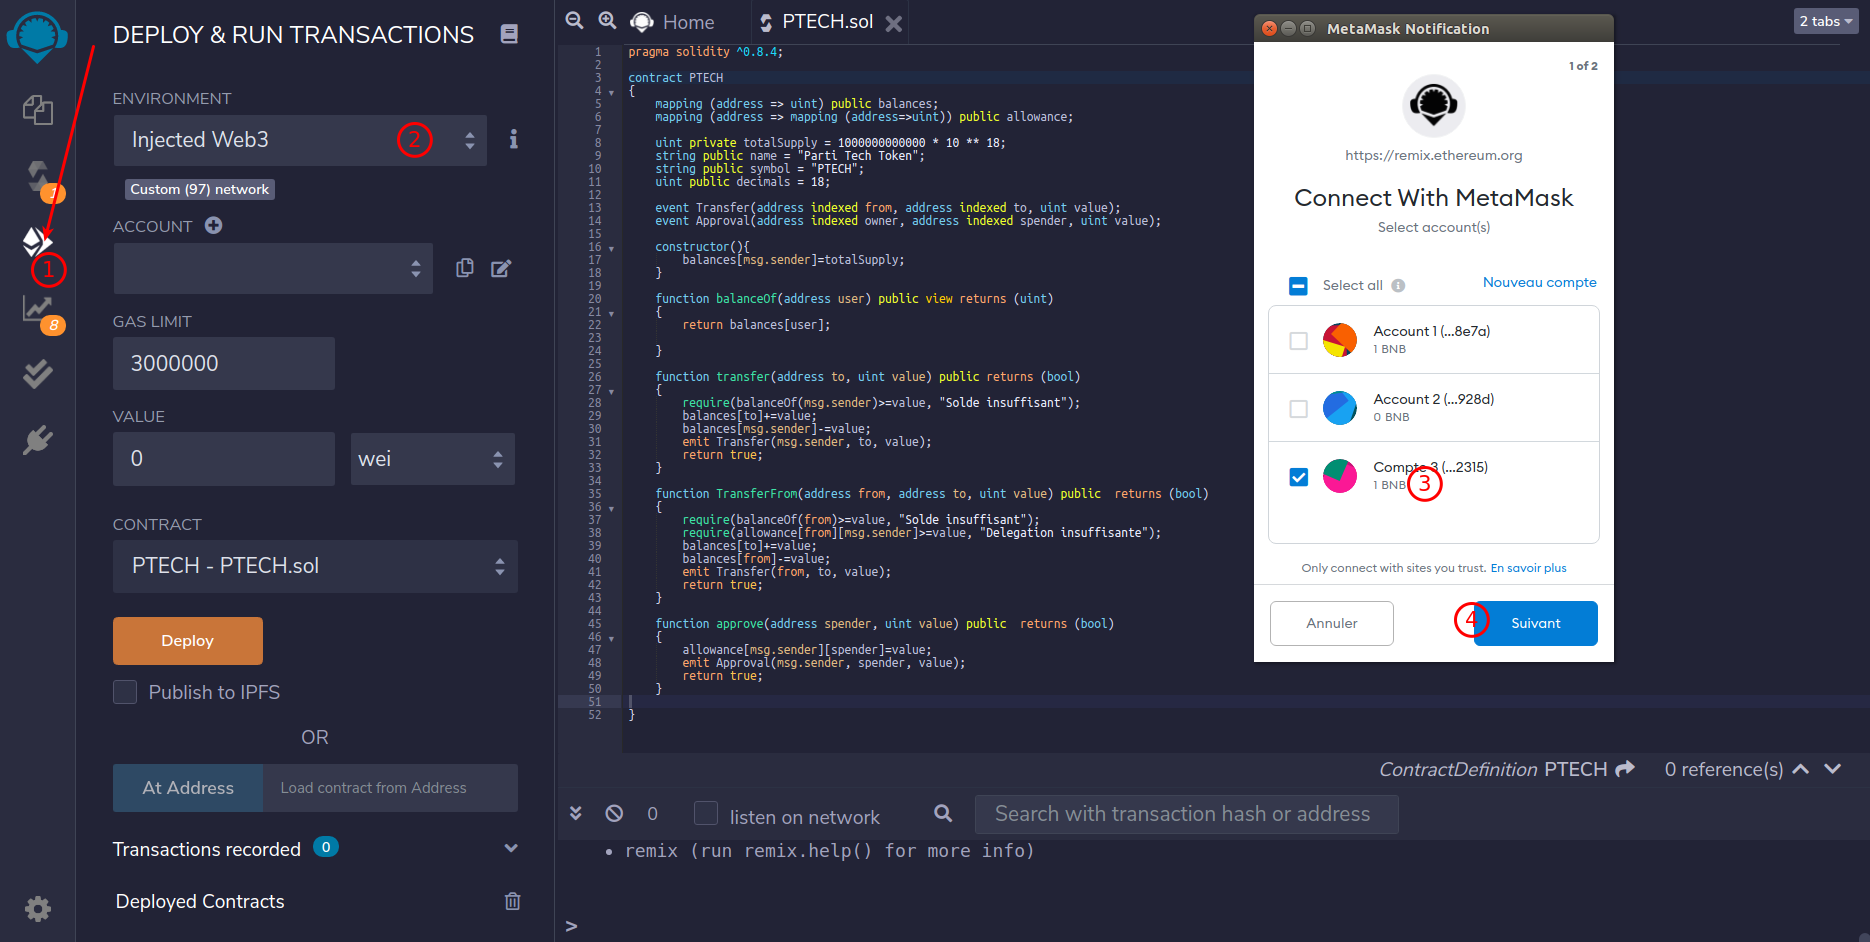
We validate.
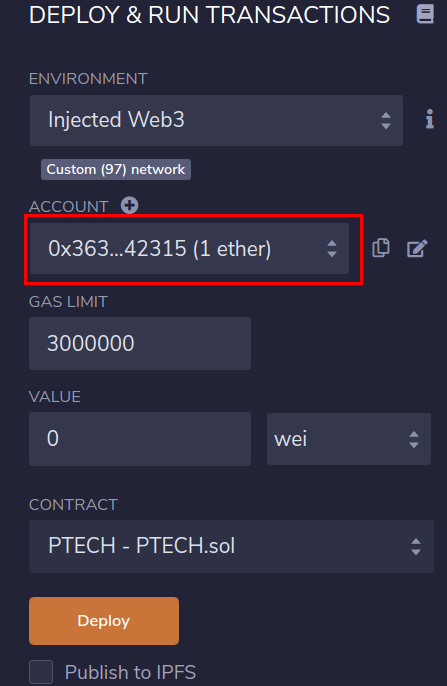
Our account number is directly filled in the interface.
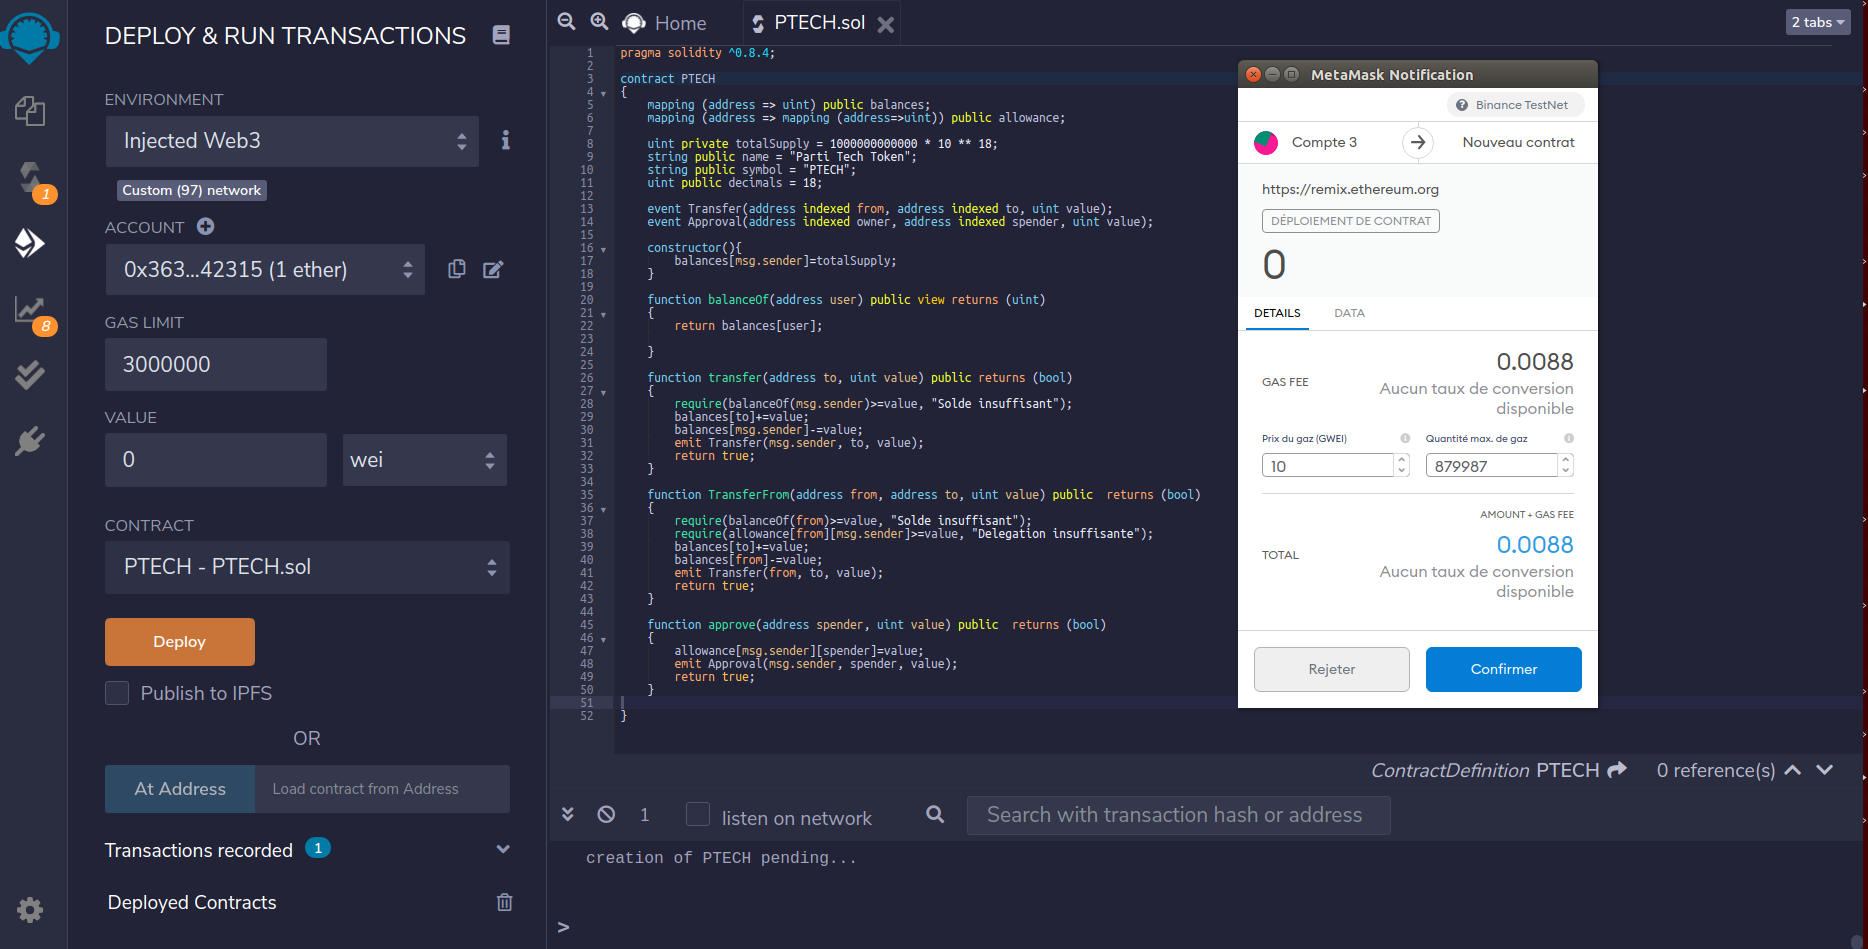
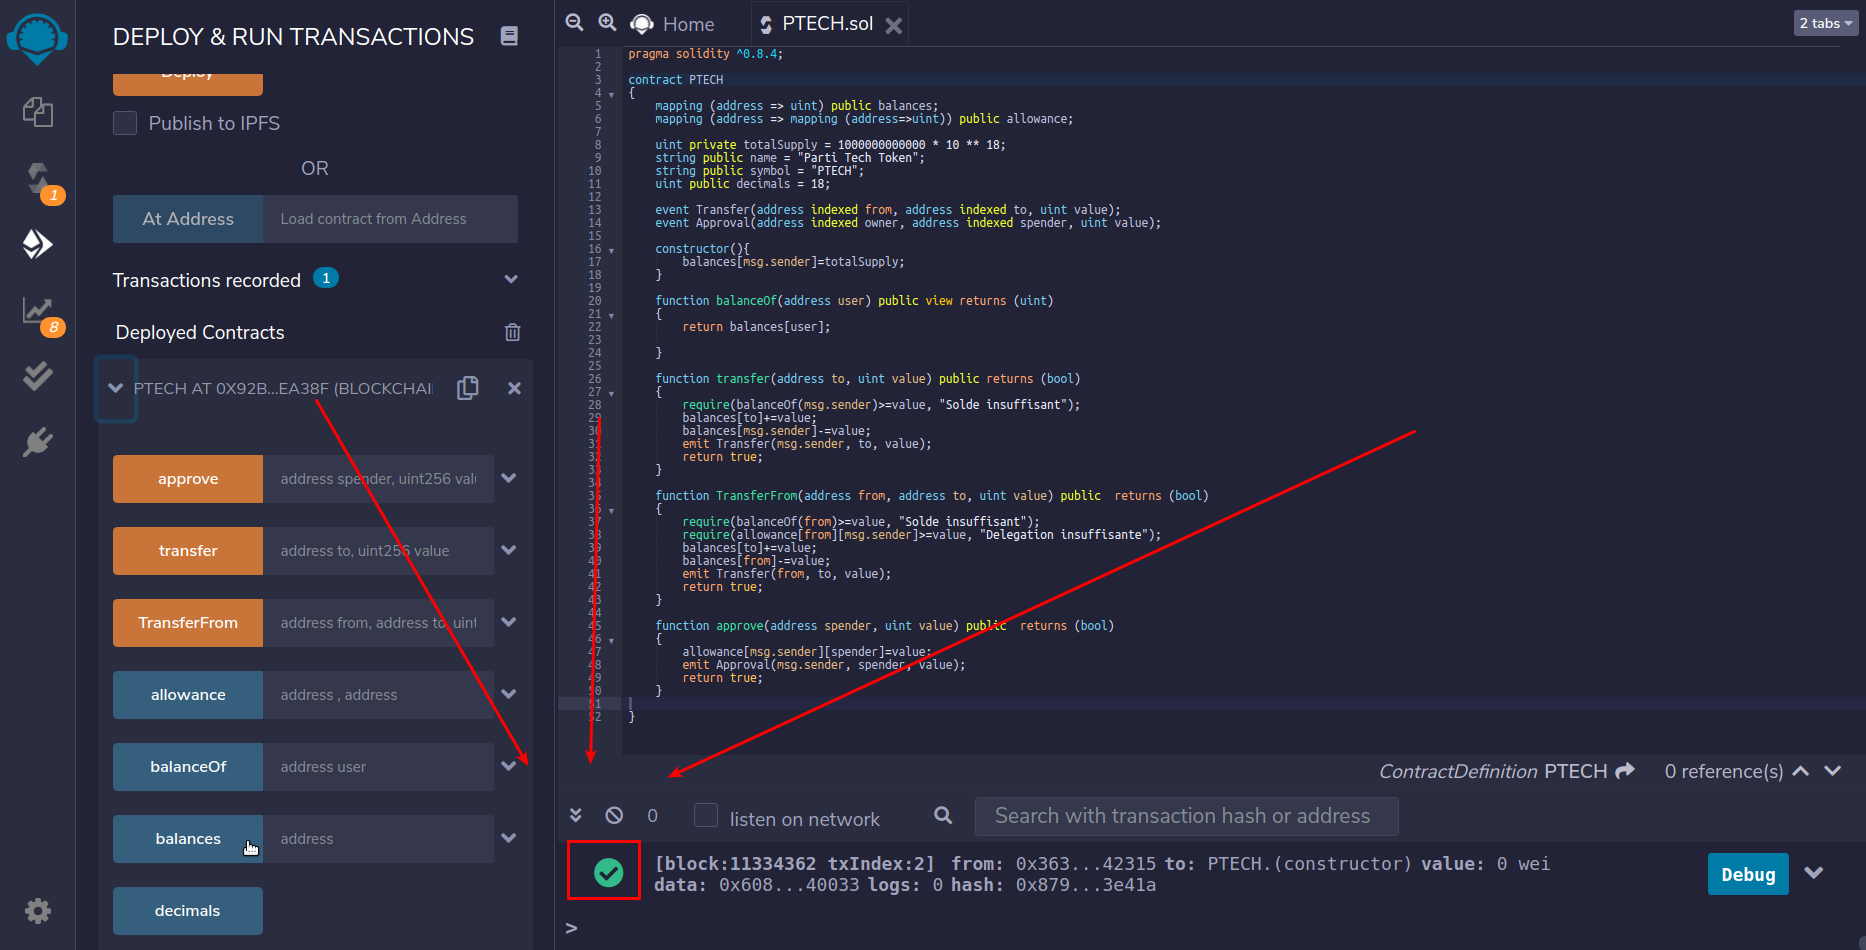
We click on "Deploy" and MetaMask asks us to validate the transaction.
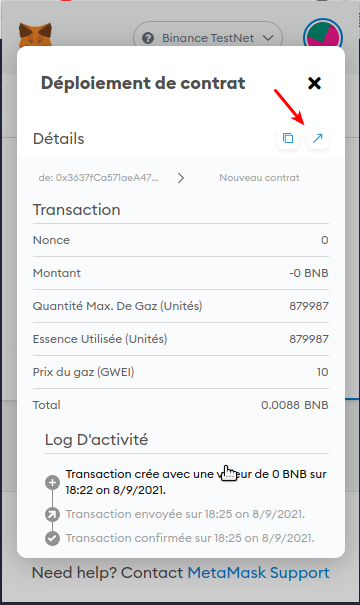
The deployment will cost us 0.0088 BNB. A trifle. Not to mention that on the TestNet, we can credit ourselves with test BNBs 😉
And we confirm.
We have the little green check mark, all is good!
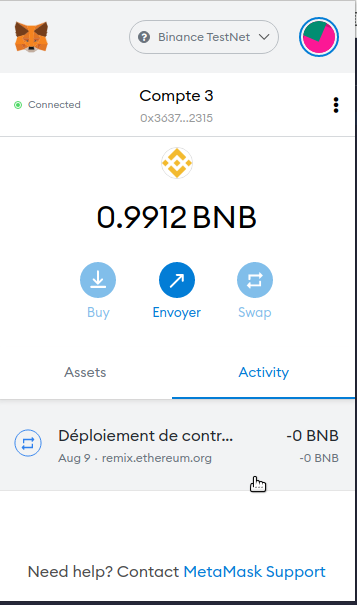
We verify the transaction in MetaMask.
We click on the link to verify the deployment on bscscan.com
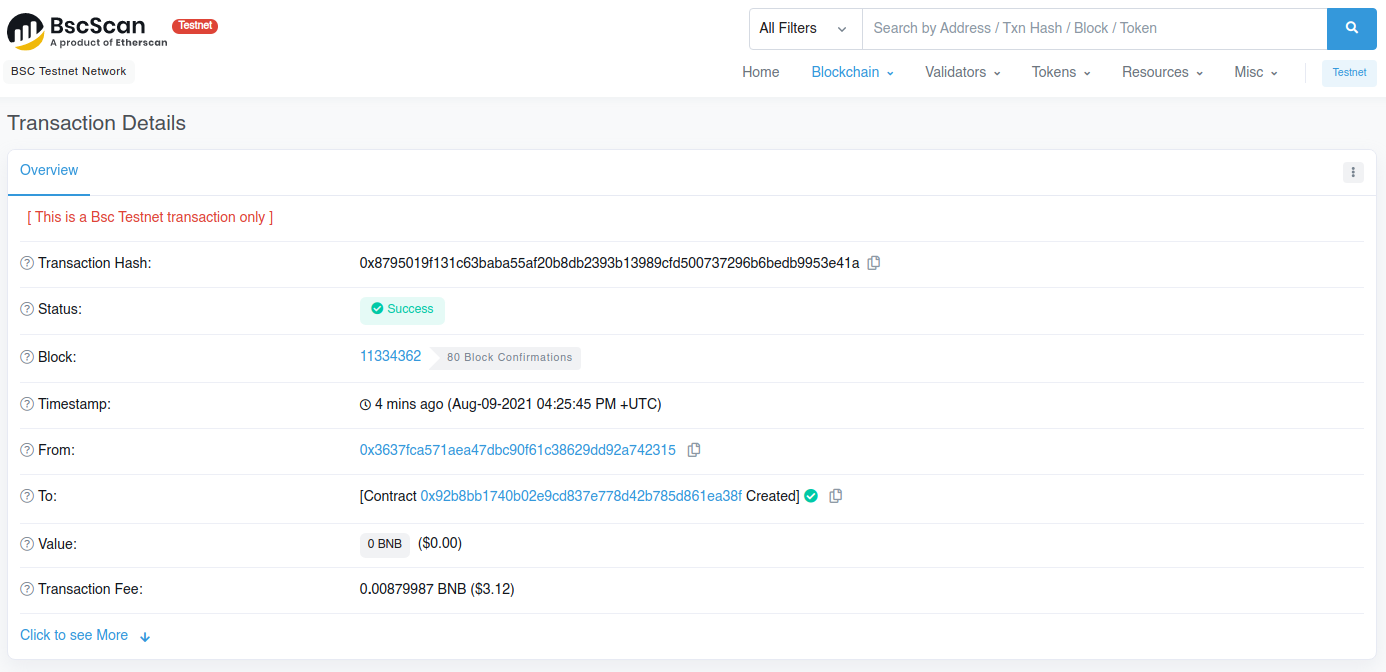
There you have it, our contract is created.
We will see in a future chapter how to add liquidity to it in order to allow trading on the different marketplaces.
